需求:
-
- 华为usg防火墙通过ipsec连接服务器。
-
- 在ipsec上面配置gre隧道。
-
- 服务器安转配置frr,通过ospf over gre获取华为防火墙的static路由表
IP:
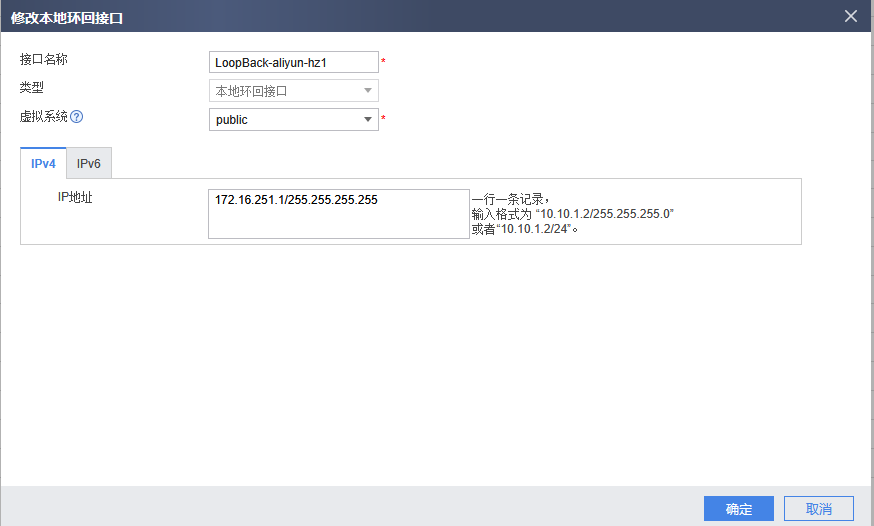
- 防火墙环回地址(IPSEC):172.16.251.1/27
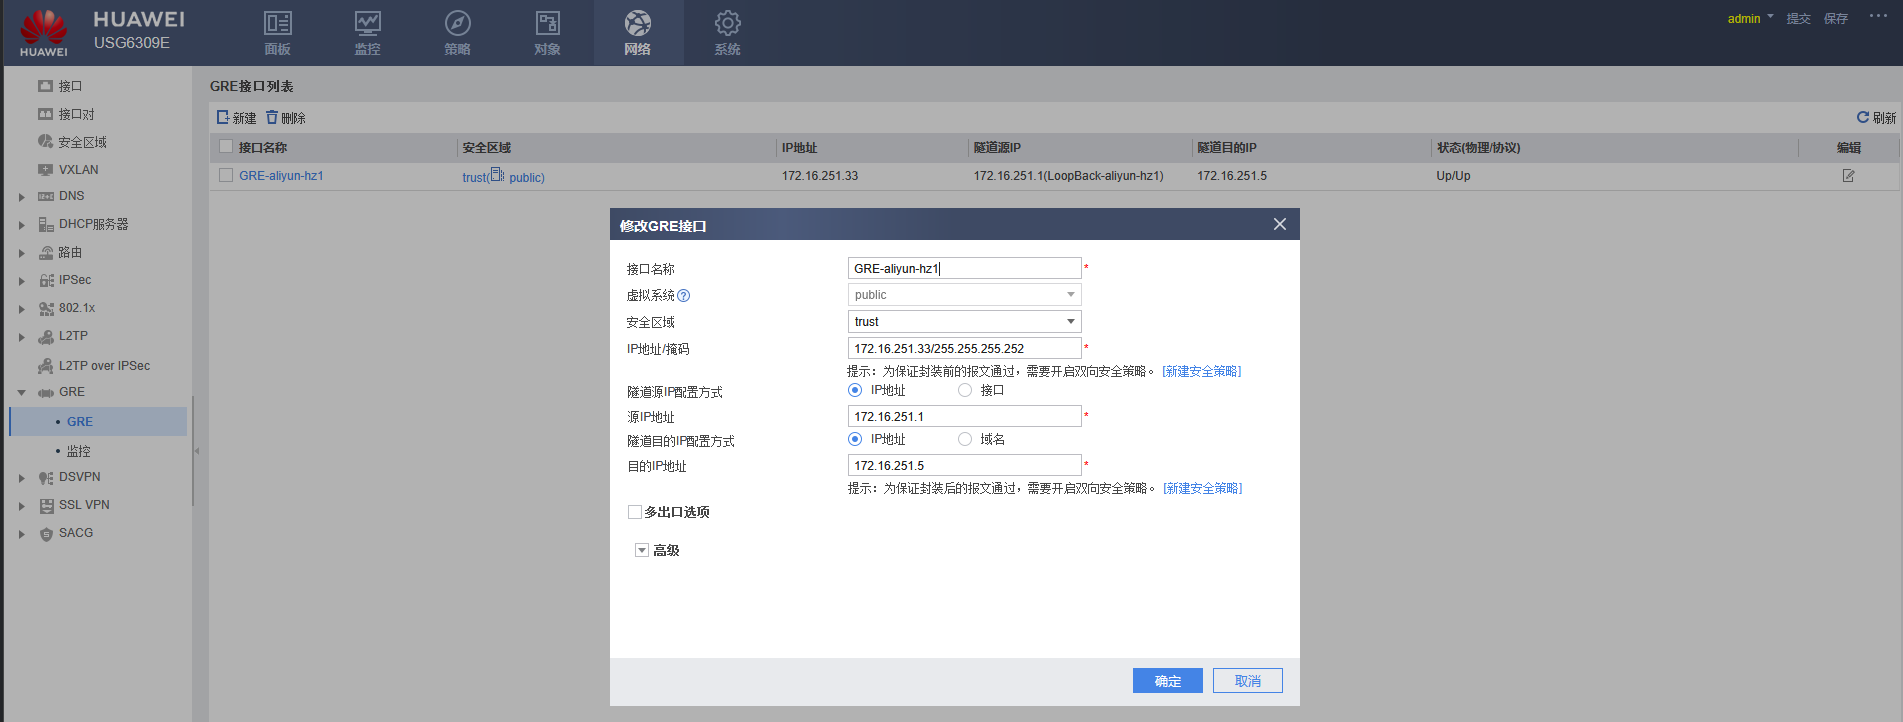
- 防火墙GRE地址:172.16.251.33/30
- 服务器内网地址(IPSEC):172.16.251.5/27
- 服务器GRE地址:172.16.251.34/30
一、配置防火墙
地址对象:


1、 配置防火墙网卡
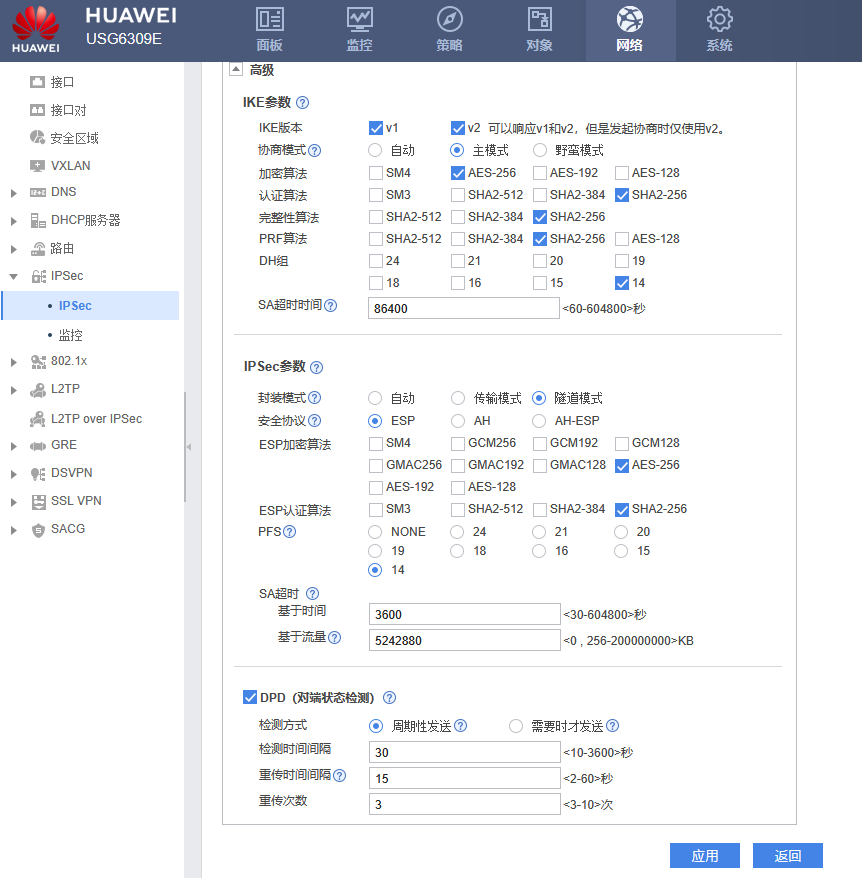
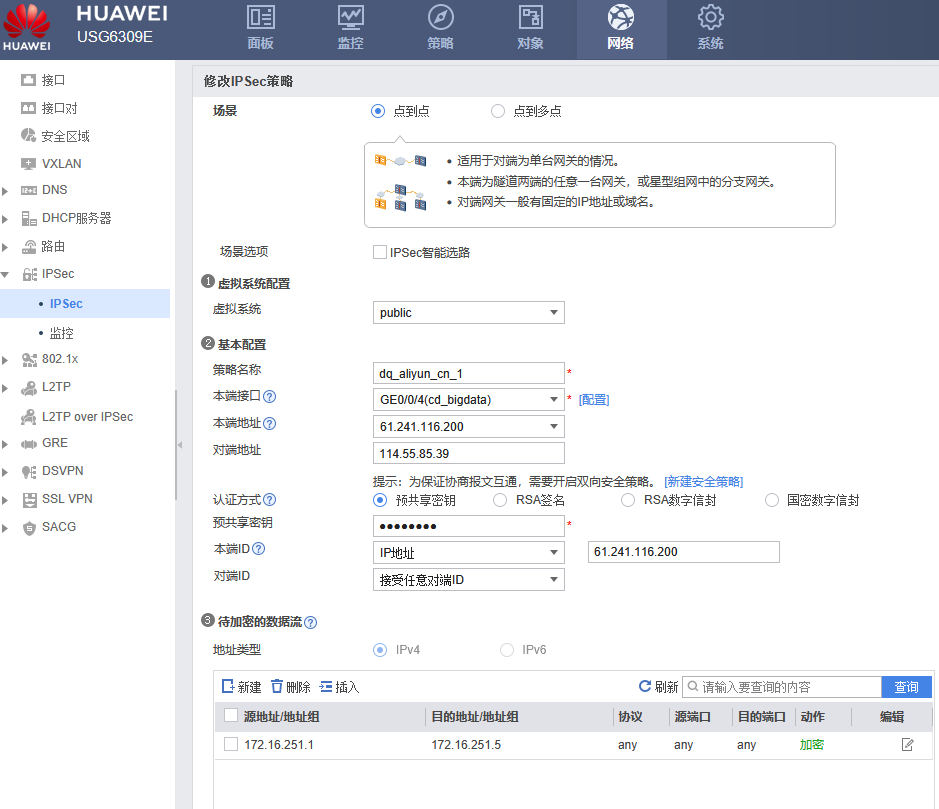
2、 配置防火墙ipsec
3、 配置GRE
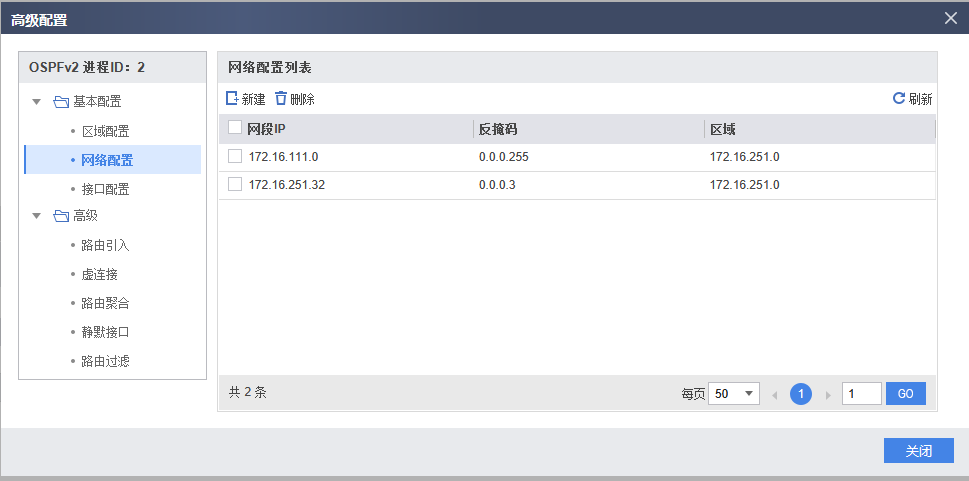
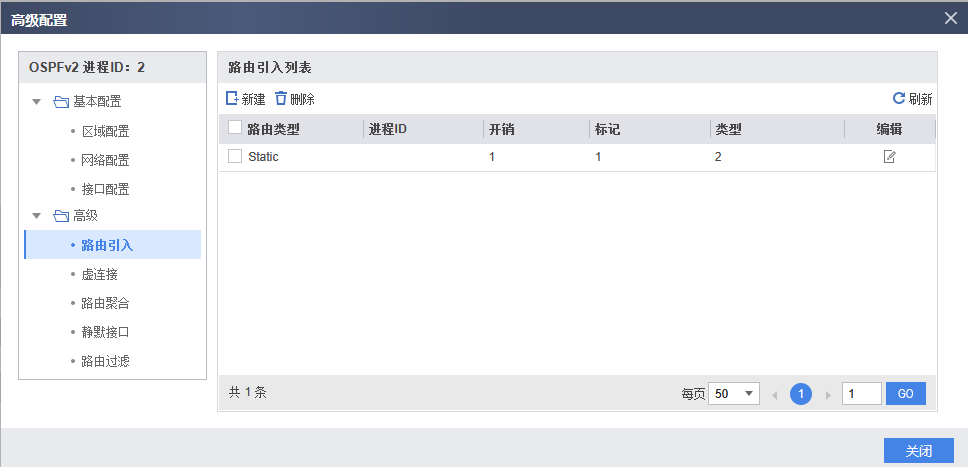
4、 配置ospf

5、配置NAT策略

6、配置安全策略

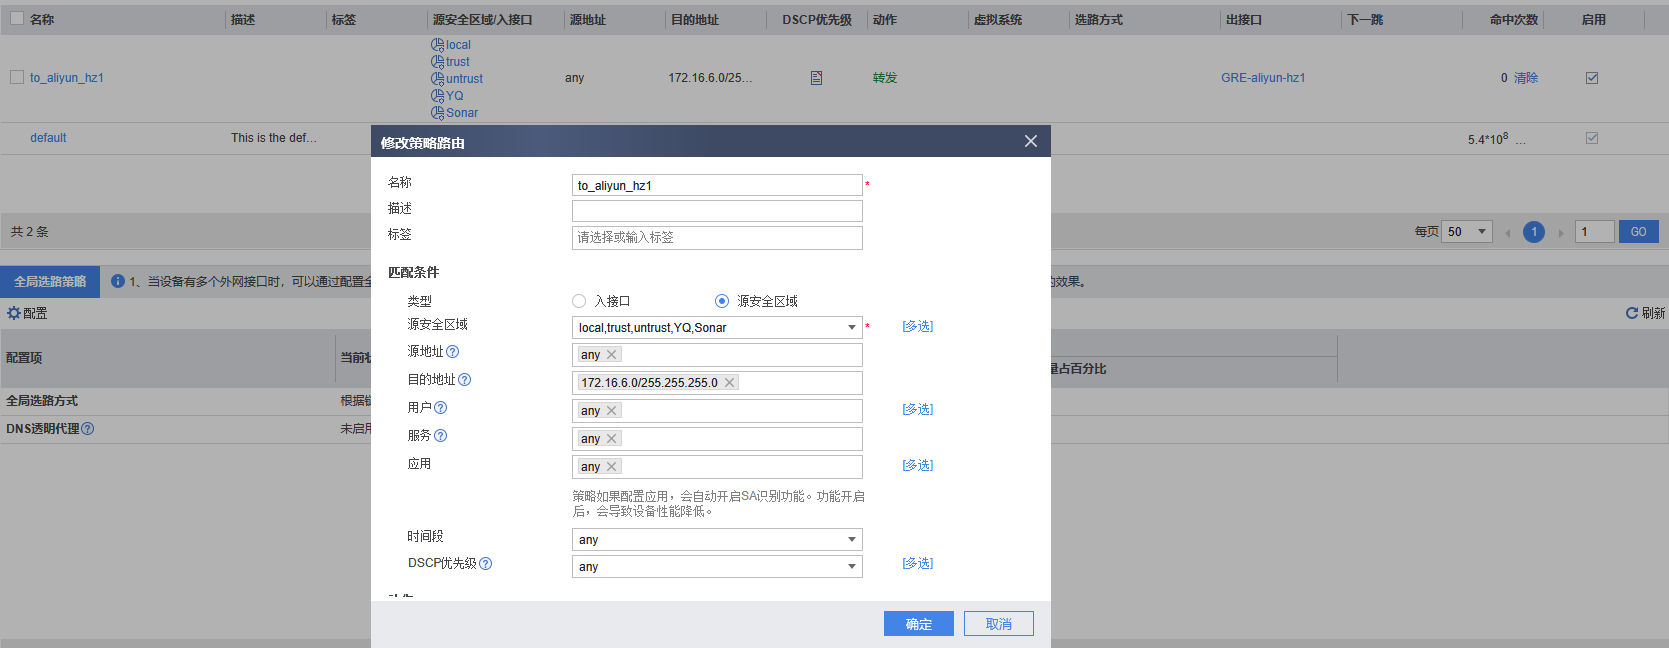
7、策略路由
二、 配置服务器
1、 配置服务器网卡,增加ipsec的内网地址,gre的地址
root@iZbp1dt8qfh5msiat5rk9eZ:~# cat /etc/netplan/50-cloud-init.yaml
# This file is generated from information provided by the datasource.  Changes
# to it will not persist across an instance reboot.  To disable cloud-init's
# network configuration capabilities, write a file
# /etc/cloud/cloud.cfg.d/99-disable-network-config.cfg with the following:
# network: {config: disabled}
network:
    ethernets:
        eth0:
            dhcp4: false
            dhcp6: false
            addresses:
            - 172.16.6.145/25
            - 172.16.251.5/27
            match:
                macaddress: 00:16:3e:46:71:83
            set-name: eth0
            routes:
            - to: default
              via: 172.16.6.253
    version: 2
    tunnels:
        tun_dq:
            mode: gre
            local: 172.16.251.5
            remote: 172.16.251.1
            addresses:
            - 172.16.251.34/30
查看ip
root@iZbp1dt8qfh5msiat5rk9eZ:~# ip a
1: lo: <LOOPBACK,UP,LOWER_UP> mtu 65536 qdisc noqueue state UNKNOWN group default qlen 1000
    link/loopback 00:00:00:00:00:00 brd 00:00:00:00:00:00
    inet 127.0.0.1/8 scope host lo
       valid_lft forever preferred_lft forever
2: eth0: <BROADCAST,MULTICAST,UP,LOWER_UP> mtu 1500 qdisc mq state UP group default qlen 1000
    link/ether 00:16:3e:46:71:83 brd ff:ff:ff:ff:ff:ff
    altname enp0s6
    altname ens6
    inet 172.16.6.145/25 brd 172.16.6.255 scope global eth0
       valid_lft forever preferred_lft forever
    inet 172.16.251.5/27 brd 172.16.251.31 scope global eth0
       valid_lft forever preferred_lft forever
......
7: tun_dq@NONE: <POINTOPOINT,NOARP,UP,LOWER_UP> mtu 1476 qdisc noqueue state UNKNOWN group default qlen 1000
    link/gre 172.16.251.5 peer 172.16.251.1
    inet 172.16.251.34/30 brd 172.16.251.35 scope global tun_dq
       valid_lft forever preferred_lft forever
2、 安装配置服务器ipsec
① 安装ipsec
apt install libreswan
② 修改配置
root@iZbp1dt8qfh5msiat5rk9eZ:~# grep -vE $'^[ ]*#|^[ ]*$|^\t#' /etc/ipsec.conf
config setup
        logfile=/var/log/pluto.log
        plutodebug=none
        virtual_private=%v4:10.0.0.0/8,%v4:192.168.0.0/16,%v4:172.16.0.0/12,%v4:25.0.0.0/8,%v4:100.64.0.0/10,%v6:fd00::/8,%v6:fe80::/10
include /etc/ipsec.d/*.conf
③ 增加ipsec连接配置
root@iZbp1dt8qfh5msiat5rk9eZ:~# cat /etc/ipsec.d/dq.conf
conn dq_61.241.116.200_local_172.16.251.5
        ikev2=insist
        pfs=yes
        ike=aes256-sha256;modp2048
        ikelifetime=86400s
        phase2=esp
        phase2alg=aes256-sha256;modp2048
        salifetime=3600s
        dpdaction=restart
        dpddelay=10
        dpdtimeout=30
        authby=secret
        type=tunnel
        left=172.16.6.145
        leftid=114.55.85.39
        leftsubnets=172.16.251.5/32
        right=61.241.116.200
        rightid=61.241.116.200
        rightsubnets=172.16.251.1/32
        auto=start
root@iZbp1dt8qfh5msiat5rk9eZ:~# cat /etc/ipsec.d/ipsec.secrets
114.55.85.39 61.241.116.200 : PSK "gsLPx07w*******"
④ 启动ipsec,查看ipsec连接状态
root@iZbp1dt8qfh5msiat5rk9eZ:~# systemctl enable --now ipsec
root@iZbp1dt8qfh5msiat5rk9eZ:~# ipsec status
......
000 Total IPsec connections: loaded 1, active 1
......
检查连接状态
root@iZbp1dt8qfh5msiat5rk9eZ:~# ping 172.16.251.1
PING 172.16.251.1 (172.16.251.1) 56(84) bytes of data.
64 bytes from 172.16.251.1: icmp_seq=1 ttl=255 time=8.02 ms
64 bytes from 172.16.251.1: icmp_seq=2 ttl=255 time=7.74 ms
64 bytes from 172.16.251.1: icmp_seq=3 ttl=255 time=33.2 ms

root@iZbp1dt8qfh5msiat5rk9eZ:~# ping 172.16.251.33
PING 172.16.251.33 (172.16.251.33) 56(84) bytes of data.
64 bytes from 172.16.251.33: icmp_seq=1 ttl=255 time=8.01 ms
64 bytes from 172.16.251.33: icmp_seq=2 ttl=255 time=7.83 ms
64 bytes from 172.16.251.33: icmp_seq=3 ttl=255 time=7.85 ms
3、 编译安装frr,配置ospf
① 安装环境
sudo apt update
sudo apt-get install -y \
   git autoconf automake libtool make libreadline-dev texinfo \
   pkg-config libpam0g-dev libjson-c-dev bison flex \
   libc-ares-dev python3-dev python3-sphinx \
   install-info build-essential libsnmp-dev perl \
   libcap-dev libelf-dev libunwind-dev \
   protobuf-c-compiler libprotobuf-c-dev
sudo apt-get -y install cmake libpcre2-dev
② 编译安装libyang
wget https://github.com/CESNET/libyang/archive/refs/tags/v2.2.8.zip
unzip libyang-2.2.8.zip
cd libyang-2.2.8
mkdir build; cd build
cmake --install-prefix /usr \
      -D CMAKE_BUILD_TYPE:String="Release" ..
make
sudo make install
③ 创建frr、frrvty用户和组
sudo groupadd -r -g 92 frr
sudo groupadd -r -g 85 frrvty
sudo adduser --system --ingroup frr --home /var/run/frr/ \
   --gecos "FRR suite" --shell /sbin/nologin frr
sudo usermod -a -G frrvty frr
④ 编译安装frr
wget https://github.com/FRRouting/frr/archive/refs/tags/frr-10.2.1.zip
unzip frr-frr-10.2.1.zip
cd frr-frr-10.2.1
./bootstrap.sh
./configure \
    --prefix=/usr \
    --includedir=\${prefix}/include \
    --bindir=\${prefix}/bin \
    --sbindir=\${prefix}/lib/frr \
    --libdir=\${prefix}/lib/frr \
    --libexecdir=\${prefix}/lib/frr \
    --sysconfdir=/etc \
    --localstatedir=/var \
    --with-moduledir=\${prefix}/lib/frr/modules \
    --enable-configfile-mask=0640 \
    --enable-logfile-mask=0640 \
    --enable-snmp=agentx \
    --enable-multipath=64 \
    --enable-user=frr \
    --enable-group=frr \
    --enable-vty-group=frrvty \
    --with-pkg-git-version \
    --with-pkg-extra-version=-MyOwnFRRVersion
make
make install
⑤ 生成配置文件
install -m 775 -o frr -g frr -d /var/log/frr
install -m 775 -o frr -g frrvty -d /etc/frr
install -m 640 -o frr -g frrvty tools/etc/frr/vtysh.conf /etc/frr/vtysh.conf
install -m 640 -o frr -g frr tools/etc/frr/frr.conf /etc/frr/frr.conf
install -m 640 -o frr -g frr tools/etc/frr/daemons.conf /etc/frr/daemons.conf
install -m 640 -o frr -g frr tools/etc/frr/daemons /etc/frr/daemons
⑥ 修改 /etc/frr/daemon,ospfd=no改为 ospfd=yes,开启ospf
root@iZbp1dt8qfh5msiat5rk9eZ:~# cat /etc/frr/daemons
# This file tells the frr package which daemons to start.
#
# Sample configurations for these daemons can be found in
# /usr/share/doc/frr/examples/.
#
# ATTENTION:
#
# When activating a daemon for the first time, a config file, even if it is
# empty, has to be present *and* be owned by the user and group "frr", else
# the daemon will not be started by /etc/init.d/frr. The permissions should
# be u=rw,g=r,o=.
# When using "vtysh" such a config file is also needed. It should be owned by
# group "frrvty" and set to ug=rw,o= though. Check /etc/pam.d/frr, too.
#
# The watchfrr, zebra and staticd daemons are always started.
#
bgpd=no
ospfd=yes
ospf6d=no
ripd=no
ripngd=no
isisd=no
pimd=no
pim6d=no
ldpd=no
nhrpd=no
eigrpd=no
babeld=no
sharpd=no
pbrd=no
bfdd=no
......
⑦ 启动服务
install -m 644 tools/frr.service /etc/systemd/system/frr.service
systemctl enable frr
systemctl start frr
⑧ 修改frr配置
root@iZbp1dt8qfh5msiat5rk9eZ:~# vtysh

Hello, this is FRRouting (version 10.2.1-MyOwnFRRVersion).
Copyright 1996-2005 Kunihiro Ishiguro, et al.

iZbp1dt8qfh5msiat5rk9eZ# configure terminal
iZbp1dt8qfh5msiat5rk9eZ(config)# router ospf
iZbp1dt8qfh5msiat5rk9eZ(config-router)# router-id 172.16.6.145
iZbp1dt8qfh5msiat5rk9eZ(config-router)# network 172.16.6.0/24 area 172.16.251.0
iZbp1dt8qfh5msiat5rk9eZ(config-router)# network 172.16.251.0/27 area 172.16.251.0
iZbp1dt8qfh5msiat5rk9eZ(config-router)# network 172.16.251.32/30 area 172.16.251.0
iZbp1dt8qfh5msiat5rk9eZ(config-router)# do write
查看配置文件 /etc/frr/frr.conf
root@iZbp1dt8qfh5msiat5rk9eZ:~# cat /etc/frr/frr.conf
frr version 10.2.1-MyOwnFRRVersion
frr defaults traditional
hostname iZbp1dt8qfh5msiat5rk9eZ
log syslog informational
no ipv6 forwarding
service integrated-vtysh-config
!
router ospf
 ospf router-id 172.16.6.145
 network 172.16.6.0/24 area 172.16.251.0
 network 172.16.251.0/27 area 172.16.251.0
 network 172.16.251.32/30 area 172.16.251.0
exit
!
⑨ 重启frr,查看路由表
root@iZbp1dt8qfh5msiat5rk9eZ:~# systemctl restart frr
root@iZbp1dt8qfh5msiat5rk9eZ:~# ip route
root@iZbp1dt8qfh5msiat5rk9eZ:~# ip route
default via 172.16.6.253 dev eth0 proto static
10.8.0.0/24 dev tap0 proto kernel scope link src 10.8.0.1
10.230.200.0/24 nhid 38 via 172.16.251.33 dev tun_dq proto ospf metric 20
10.230.210.0/24 nhid 38 via 172.16.251.33 dev tun_dq proto ospf metric 20
47.108.221.242 nhid 38 via 172.16.251.33 dev tun_dq proto ospf metric 20
118.113.15.77 nhid 38 via 172.16.251.33 dev tun_dq proto ospf metric 20
120.24.191.125 nhid 38 via 172.16.251.33 dev tun_dq proto ospf metric 20
156.234.39.147 nhid 38 via 172.16.251.33 dev tun_dq proto ospf metric 20
172.16.6.128/25 dev eth0 proto kernel scope link src 172.16.6.145
172.16.111.0/24 nhid 38 via 172.16.251.33 dev tun_dq proto ospf metric 20
172.16.112.0/24 nhid 38 via 172.16.251.33 dev tun_dq proto ospf metric 20
172.16.113.0/24 nhid 38 via 172.16.251.33 dev tun_dq proto ospf metric 20
172.16.114.0/24 nhid 38 via 172.16.251.33 dev tun_dq proto ospf metric 20
172.16.115.0/24 nhid 38 via 172.16.251.33 dev tun_dq proto ospf metric 20
172.16.116.0/24 nhid 38 via 172.16.251.33 dev tun_dq proto ospf metric 20
172.16.251.0/27 dev eth0 proto kernel scope link src 172.16.251.5
172.16.251.32/30 dev tun_dq proto kernel scope link src 172.16.251.34